Web development tutorial A-1
Lesson 1: Learn HTML from Scratch - A Comprehensive Introduction with Tools Setup
Website design
January 29, 2025
Lesson 1: Learn HTML from Scratch - Comprehensive Introduction with Tool Setup
Welcome to the first lesson of the series "Learn HTML from Scratch to Mastery"! If you are completely new to web development, this lesson is the perfect starting point for you. We will guide you step-by-step to understand the basics of HTML, its importance, and how to use it to create simple web pages. Additionally, we will learn how to set up the necessary tools like Visual Studio Code (VS Code) for writing code easily and professionally.
What is HTML?
- HTML stands for HyperText Markup Language, and it is the foundational language used to create web pages.
- HTML is not a programming language but a descriptive language used to define the structure and content of web pages, such as text, images, links, and tables.
- HTML is considered the backbone of all websites, as it describes the elements on a page and how they are displayed.
Importance of HTML
✅ Creating Web Pages: HTML is the building block of any website.
✅ Ease of Learning: HTML is a simple and easy-to-understand language, making it an ideal starting point for beginners.
✅ Compatibility with Other Technologies: HTML is used alongside other languages like CSS for styling pages and JavaScript for adding interactivity.
How Does HTML Work?
HTML works using tags, which are instructions written within angle brackets < >.
Each tag has a specific function, such as displaying text as headings or paragraphs, or inserting images and links.
A Simple Example of an HTML Tag:
<h1>Welcome to Learning HTML!</h1>
This code displays the text "Welcome to Learning HTML!" as a main heading.
Setting Up the Necessary Tools
1. Downloading and Installing Visual Studio Code
Visual Studio Code (VS Code) is a powerful and free text editor widely used for writing code.
Download the program:
- Visit the official website of Visual Studio Code.
- Choose the version suitable for your operating system (Windows, macOS, or Linux).
Install the program:
- After downloading the file, open it and follow the installation steps.
- During the installation, make sure to select the "Add to PATH" option for easier access to the program.
Open the program:
- After installation, open the program, and you will see a simple user interface.
2. Creating an HTML File Using VS Code
Create a Project Folder:
- Create a new folder on your computer to store the project files, such as HTML_Project.
Open the Folder in VS Code:
- Open Visual Studio Code, then select File > Open Folder, and choose the folder you created.
Create an HTML File:
- Right-click inside the folder in the VS Code sidebar, then select New File.
- Name the file index.html.
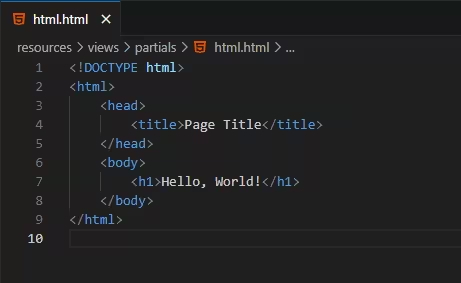
Writing the Code:
Save the File:
- Press Ctrl + S (or Command + S on macOS) to save the file.
3. Viewing the File in the Browser
✅ Right-click on the index.html file inside VS Code, then select Open with Default Browser (if you have added the Live Server extension).
✅ Alternatively, you can simply open the file manually by double-clicking it in your file explorer.
Code Explanation
🔹 <!DOCTYPE html>: Informs the browser that we are using HTML5, which is the latest version of HTML.
🔹 <html>: The main tag that contains all the contents of the page.
🔹 <head>: Contains information that is not visible to the user, such as the title of the page.
🔹 <title>: Defines the title of the page that appears in the browser's title bar.
🔹 <body>: Contains the visible content for the user, such as text and images.
Basic HTML Tags
1. Headings
<h1>This is a Main Heading</h1><h2>This is a Subheading</h2><h3>This is a Less Important Heading</h3>
Tags <h1> to <h6> are used to create headings in descending order of size and importance:
2. Paragraphs
<p>This is a text paragraph containing information.</p>
The <p> tag is used to create a text paragraph:
3. Links
<a href="https://www.google.com">Go to Google</a>
The <a> tag is used to create hyperlinks:
4. Images
<img src="image.jpg" alt="Image Description">
The <img> tag is used to add images:
5. Lists
Ordered List:
<ol> <li>First Item</li> <li>Second Item</li></ol>
Unordered List:
<ul> <li>First Item</li> <li>Second Item</li></ul>
Practical Exercise
Try creating an HTML page containing the following elements:
✅ A main heading using <h1>.
✅ A paragraph with a short description about yourself.
✅ A link to your favorite website.
✅ An image of your choice.
✅ An ordered list with three goals you want to achieve.
What's Next?
In the next lesson, we will explore more advanced HTML tags, such as tables and forms, and learn how to style pages using CSS. Get ready for an exciting and engaging practical application!
Tip:
Keep experimenting and practicing. HTML is a fun and easy language, and you will learn it quickly if you practice regularly. 🚀
Comments

There are no comments
Please login to leave a review